Taking a screenshot on Windows 10 and 11 is easy. Regardless of the ease of use, only a few users know how to take a screenshot on Windows 10 and 11. There are a number of methods you can use.
We’ve covered the best ways to take a screenshot on Windows 10 and 11. Let’s get started.
Methods to Take a Screenshot on Windows 10 & 11
Here are all the ways you can use to take a screenshot on Windows 10 and Windows 11.
1. Use the Print Screen Button

The easiest and the best way to take a screenshot of your entire screen on Windows 10 and Windows 11 is by pressing the Print Screen (PrtScn) button on your keyboard.
The screenshot will automatically be copied to your clipboard. You can paste it to your desired destination or save it into a folder. To save the screenshot, paste it in Microsoft Word or Paint, from there, save the file.
Bonus Tip – By pressing Windows key + V, you can bring up the clipboard to view all the screenshots you’ve taken.
2. Windows Key + Print Screen
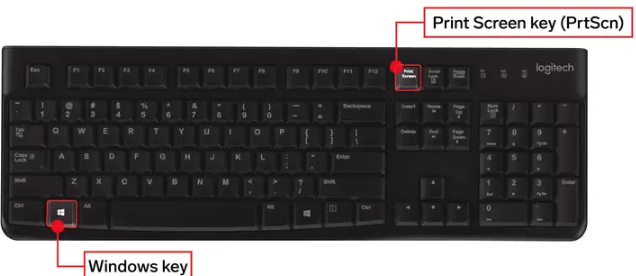
The easiest and the best way to take a screenshot of your entire screen on Windows 10 and Windows 11 is by pressing the Print Screen (PrtScn) button on your keyboard.
The screenshot will automatically be copied to your clipboard. You can paste it to your desired destination or save it into a folder. To save the screenshot, paste it into Microsoft Word or Paint, and from there, save the file.
Bonus Tip – By pressing Windows key + V, you can bring up the clipboard to view all the screenshots you’ve taken.
3. Alt + Print Screen
When you press Alt + Print Screen, you’ll be able to take a screenshot of the active Window you’re working in. Windows will copy the screenshot on your clipboard and you can save it by pasting it into another program.
4. Snipping Tool in Windows 10 & 11
Both Windows 10 and 11 have a snipping tool (also called Snip & Sketch app) to take a screenshot. It is the best tool you can use if you want to take custom screenshots.
If you want to customize, annotate, or share your screenshots, the Snipping tool is great. It gives you additional tools to use for your screenshots, such as a ruler, an eraser, and crop tools.
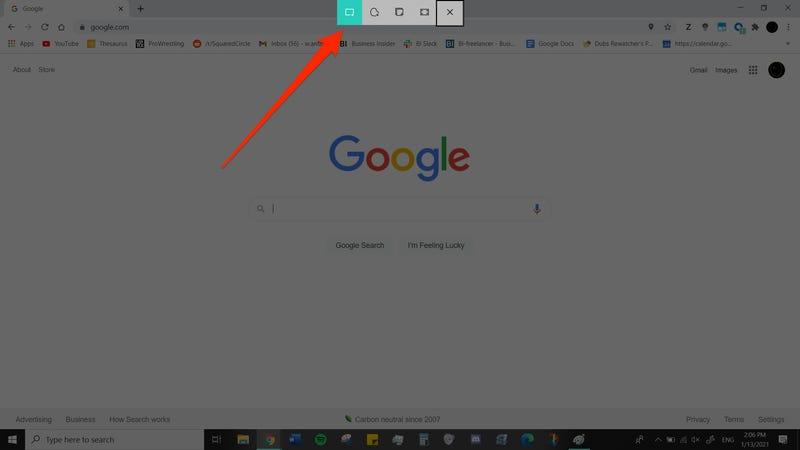
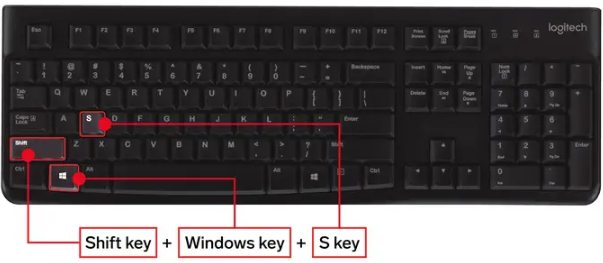
To activate the snipping tool, press Windows + Shift + S. A small menu bar will appear on top of your screen, with options to take a rectangular, free-form, Window, or full-screen capture.
Once you save the screenshot, it’ll be copied to your clipboard, and a preview notification will appear on the bottom right corner of your screen.
When you click on the notification, you’ll be able to save, share, or edit the screenshot with the available tools.
5. Use the Game Bar
The Game Bar is an overlay in all the Windows apps and games to take a screenshot and record videos of your screen. Here are the steps to take a screenshot on Windows 10 and 11 using the game bar.
- Press Windows + G.
- An overlay menu will open up. In the menu, click the Capture button (Camera icon).

- In the menu, click on the Camera icon to take a screenshot.You can also record a video by pressing the record button.
All the photos and videos you take using the Game Bar are saved in PNG and MP4 format and you can find them in File Explorer>Videos>Captures.
6. Power + Volume Up
Another way to take a screenshot on Windows 10 and 11, press the Power Button + Volume Up Button. The screen will dim automatically, and Windows will automatically save the screenshot in Pictures > Screenshots folder.
Bonus Tip – This particular method works only on Microsoft Surface devices. If you’re using a Microsoft Surface 3 or earlier, you’ll need to press the Windows Logo + Volume Down button.
7. Third-Party Screenshot Apps
If you don’t like any of the in-built screenshot-taking features of Windows 10 and Windows 11, you may want to try out third-party apps.
- Lightshot – It’s a free screenshot tool for Windows. When you download Lightshot on your device, it’ll replace the Print Screen function and offer better editing capabilities.
- Greenshot – This is another tool you can use to take a screenshot. You can take and edit screenshots. There’s also an option to capture a complete scrolling web page.
- ScreenRec – This is a free Windows recording tool that you can use to take screenshots and record videos. It includes tools to annotate your recordings and screen grab. You can also create a link to share with others so they can instantly view them.
Snagit – This is an incredible Windows screenshot-taking tool; you can create animated GIFs and take full-page screenshots. Unfortunately, the tool is paid. There’s a 30-day free trial period that you can take advantage of. Once the trial is over, you’ll have to pay $50 for the full tool.