
Windows 11 is the latest version of Windows OS and it is also the best-looking. While Microsoft has focused on improving the user-friendliness of this version, some parts of it have become a bit difficult to use for users. This blog is dedicated to troubleshooting all the small issues with Windows 11.
Let’s get started.
In this blog, we will be covering these topics:
- How to Change Start Menu to the Left in Windows 11
- How to Show Hidden Files in Windows 11
- How to Show File Extension in Windows 11
How to Move Windows 11 Start Menu to the Left?
If you’ve updated to the latest version of Windows 11, you’ll notice that the start menu is placed in the middle instead of the original left-hand style. If you aren’t liking the new look (which I loved btw), you can change the start menu to the left side.
So, If you’re working on a widescreen monitor, then the center start menu looks sophisticated. But if you want to change it, the process is quite easy.
Here are the steps you need to follow to change Windows 11 start menu to left or you can say move the start menu to the left side in Windows 11:
- Open the taskbar settings by right-clicking on the taskbar and clicking on “Taskbar Setting.”

- Click on “Taskbar behaviors: and change the “Taskbar alignment” setting to Left.
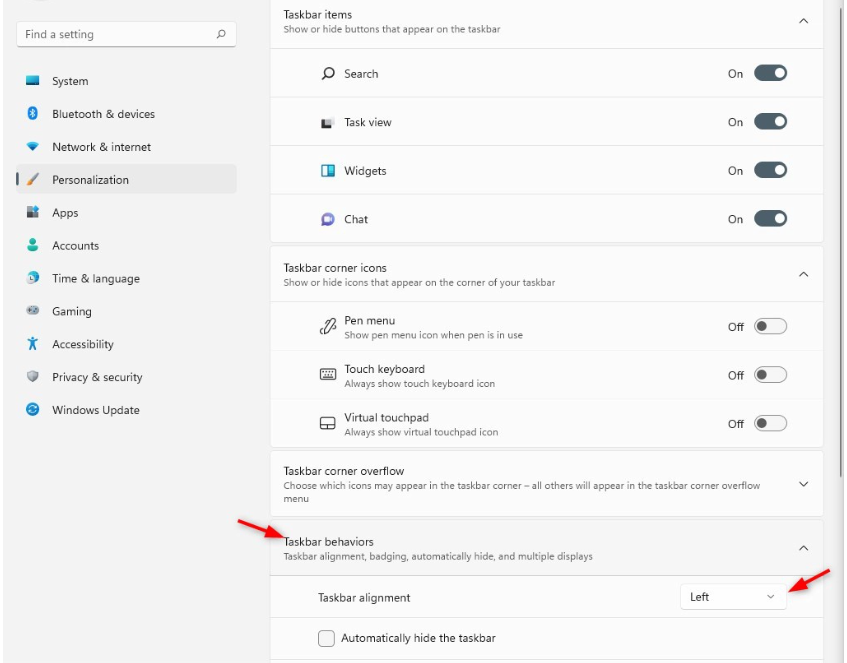
- Your start menu will now start showing up on the left side instead of the middle.
How to Show Hidden Files in Windows 11?
If you’ve recently updated to Windows 11, you may have noticed that some files have gone missing. In general, Windows 11 has tons of hidden files that you just can’t find normally. If you can’t find these files normally, then you’d have to find other ways to access them. In Windows 11, you can find hidden files after doing a little bit of troubleshooting.
Here are the steps to find hidden files in Windows 11:
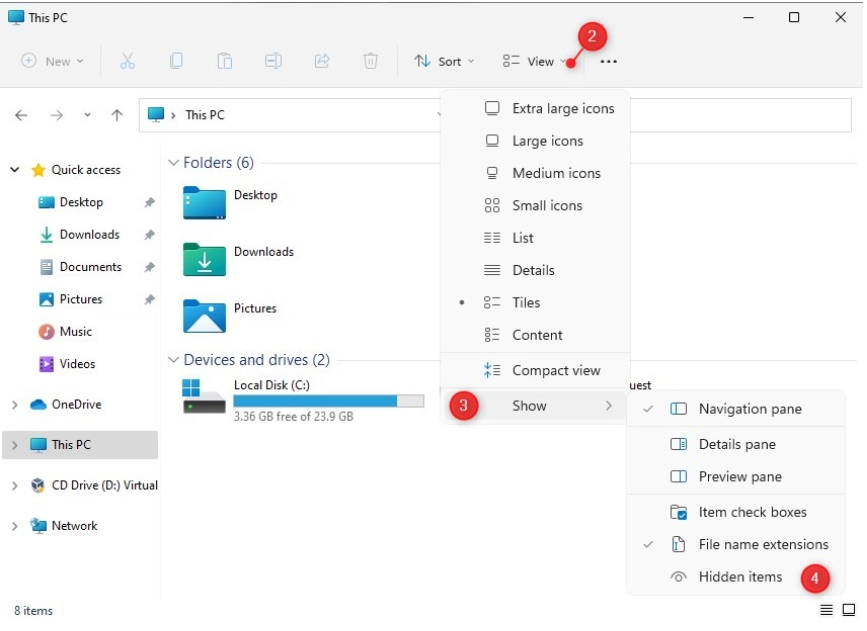
- Open Windows Explorer (Windows Key + E)
- Click on View Menu
- Select Show
- Click on Hidden Items to show them
After doing this, if you go to your Local Disk (C:), you’ll be able to see a folder that’s normally hidden from users – Program Data.
You can find these recognized hidden files and folders by the icons next to them. The hidden folder icons have a bit of transparency compared to other ones.
Use Windows Registry to Show Hidden Folders
If this step doesn’t work for you for some reason, you can use the Windows 11 registry to show hidden files in Windows 11. Using this step is incredibly helpful if you’re planning to change the settings on multiple devices with a PowerShell script of Group Policy.
To show hidden files in Windows 11, you’ll need to set the key to 0.
HKEY_CURRENT_USER\Software\Microsoft\Windows\CurrentVersion\Explorer\Advanced\Hidden
Set the key “Hidden” to 1 to show the hidden files and folders.
How to Show File Extension/Type/Format in Windows 11?
The showing file extensions had been relocated in the new explorer design. File extensions help you in identifying the files. They aren’t shown to users as a default feature, but in Windows 11, you can easily show file extensions from the view menu.
Here are the steps you need to follow:
- Open the File Explorer (Windows key + E or go to it from the taskbar)
- Click on “View“
- Choose the “Show” option
- Click on “File name extensions”

These are all the steps you need to follow to show extensions in Windows 11. If you want, you can also use the old folder options. You’ll find these options under the 3-dots option.
Showing File Extensions Using Registry in Windows 11
If you want to show file extensions on multiple devices at the same time, then you can use the registry item to enable or disable it. Registry keys allow you to change settings on multiple devices at the same time with a PowerShell Script or Group Policy.
Use this registry key
Computer\HKEY_CURRENT_USER\Software\Microsoft\Windows\CurrentVersion\Explorer\Advanced
Change the “HideFileExt” key 0 to show the file extensions in Windows 11 on multiple devices.
Importance of Showing File Extensions
The only main purpose of showing file extensions is that it can help you protect your device. The file extension determines which program Windows 11 uses to open the file. Most people don’t know about extensions or how they work, so Microsoft doesn’t show them.
File extensions showcase what kind of files you’re about to open. If you’re about to open a document file that you’ve downloaded, then the file extension would show as a .doc file. If it’s a virus or malware file, it will show up as a .exe file.
When you enable file extensions in Windows 11, you can recognize the extensions and make sure that you’re using the correct file and not some kind of threat to your device.
Apart from a security standpoint, it is also more convenient when you’re looking for a particular file format. You may have different versions of the same file, so you’ll be able to find the right file quickly.
Conclusion – Windows 11 Features Tips
Windows 11 has most features on the front itself, and all of them are pretty easy to access. You can customize pretty much every part of your device with the range of customization options that Windows 11 has now to offer.